|
|
Command line Java Scripts:
|
|
|
Java scripts can be run from the command line by using the following command
SimLabComposer.exe -js “File.js”
So if the user named the first script as example.js, and saved it in folder C:\Scripts, The user should use the following command
SimLabComposer.exe -js “C:\Scripts\example.js”
|
|
|
Passing arguments to Java Scripts:
|
|
|
Looking at the My First Java Script example below, the user defined on top of the java script the name of the file to be imported and the output image file.
|
|
|
|
|
|
For this script to work as expected, it is the users responsibility to name and place the input file as "c:\\temp\\input.obj" and to make sure the output file "c:\\temp\\output.png" is copied to another place before re-running the java script, so it is not overwritten.
Another option for the user is to use the input file name and the output image name as arguments as shown in the following scripting
To do this, instead of defining the variables on top of the script as done before, we can use the runtime.args functionality, as shown in the following example:
var inputFile = runtime.args.getAsString( "-i" ); //you can pass this arg if you want to import another file that isn't included in your current scene
var outputImage = runtime.args.getAsString( "-o" );
Other than changing the first two lines, the rest of the script is just the same.
To use the argument based script as before the user should use the following command:
SimLabComposer.exe -js "C:\Scripts\script.js" -i “c:\\temp\\input.obj” -o “c:\\temp\\output.png”
This allows the user to control the import file and output image on the command line.
|
|
|
runtime.args supports the following argument types:
|
|
|
|
|
|
The following script, imports a file, sets camera in a good position, and renders an image and saves it.
|
|
|
var inputFile   = "c:\\temp\\input.obj";
var outputImage = "c:\\temp\\output.png";

scene.reset(); // First we clean the scene

var importedScene = scene.importFile(inputFile); // We import the input file
var bBox = importedScene.computeBoundingBox(); // Get the bouding box of the scene
var displacementFromWorldCenter = new Vector3(-bBox.center.x, -bBox.center.y, -bBox.center.z);

importedScene.transform.translateInPlace(displacementFromWorldCenter);  // Move the model to the world center

var newCamera= scene.createCamera();  //Create new Camera

newCamera.fov = 30;
newCamera.position.set(1.5*(bBox.max.x - bBox.min.x),1.5*(bBox.max.y - bBox.min.y), 3*(bBox.max.z - bBox.min.z)); //Set psotion of the camera
newCamera.up.set(0,0,1);
newCamera.targetPosition.set(0,0,0); //Set targer of the camera

runtime.setView(newCamera); // Use the new Cemera

scene.render(outputImage, 600, 400);
|
|
|
|
|
|
Interactive Scripting - Running Java script interactively
|
|
|
The user can run Java Scripts interactively in different ways:
|
|
|
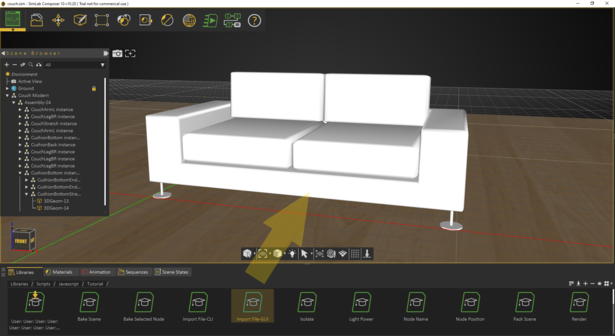
1. Select a script from the scripting library, drag it, and drop it on the 3D area
|
|
|
|
|
|
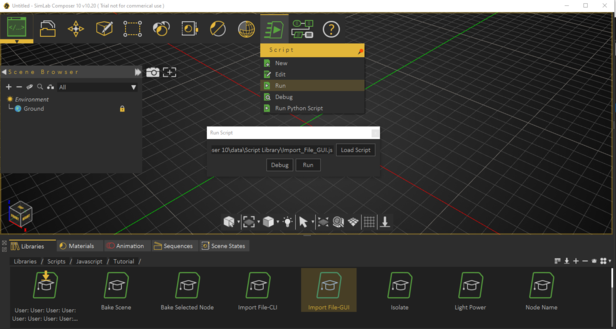
2. Select a script from the library, then from the Script menu, click Run
|
|
|
|
|
|
3. Click Run in the script dialog, for the Import file dialog to appear.
|
|
|
|
|
|
Using UI Elements In Interactive Mode:
|
|
|
Interactive Java scripts allows the user to create a dialog from the script to collect needed data, supported types include:
-
DATA_TYPE_VALUE: value number
-
-
-
DATA_TYPE_VECTOR3: vecotr 3
-
DATA_TYPE_RAY3: ray 3 (the user can enter the value or pick from the scene)
-
DATA_TYPE_NODE: scene node (the user can enter name, or select from the scene) DATA_TYPE_NODE_ARRAY: array of scene nodes
-
-
DATA_TYPE_FILENAME_OPEN: open file name
-
DATA_TYPE_FILENAME_SAVE: save file name
|
|
|
The user can simply create GUI to collect users data by using the following command:
var data = runtime.ui.getData("Enter First and Last Frames:",
[{type: runtime.ui.DATA_TYPE_VALUE, label:"FirstFrame:" },
{type: runtime.ui.DATA_TYPE_VALUE, label:"LastFrame:" }], true);
|
|
|
This script will simply create a frame and allow the user to input values of First and Last frames
Values set by the user will be defined in data[0] and data[1].
|
|
|
|
|
|
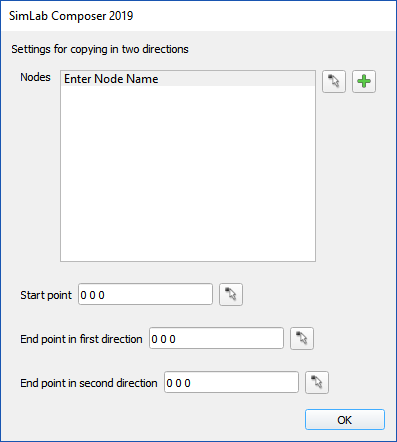
The dialog above was created using the following script:
var data = runtime.ui.getData("Settings for copying in two directions", [
{type: runtime.ui.DATA_TYPE_NODE_ARRAY, label : "Nodes "},
{type: runtime.ui.DATA_TYPE_VECTOR3, label : "Start point"},
{type: runtime.ui.DATA_TYPE_VECTOR3, label : "End point in first direction"},
{type: runtime.ui.DATA_TYPE_VECTOR3, label : "End point in second direction"}
]);
|
|
|
The user can set any number of inputs needed for the java script to run, this script is taking multiple objects (Nodes) and two directions which entered by user to copy these objects In two directions.
|
|
|
|
|
|
Debugging
|
|
|
The integrated debugger in the interactive mode makes it easy for Java Script writer to follow the execution of the Java Script, and to check the values of variables, which makes creating new Java scripts faster, and fixing issues in existing ones easier.
|
|
|
Find the all scripting commands for SimLab Composer online in this page. |
|
|
|
|
|
|
|
|
|
Num
|
Description
|
|
1
|
Code Widget: The code widget shows the code of the currently selected script. The widget displays an arrow in the left margin, marking the code line that is being executed. Clicking in the margin of a line will cause a breakpoint to be toggled at that line. A breakpoint has to be set on a line that contains an actual statement in order to be useful. When an uncaught script exception occurs, the offending line will be shown with a red background.
|
|
2
|
Continue: Evaluation will resume normally.
|
|
|
Step Into: Evaluation will resume until the next statement is reached.
|
|
|
Step Over: Evaluation will resume until the next statement is reached; but if the current statement is a function call, the debugger will treat it as a single statement.
|
|
|
Step Out: Evaluation will resume until the current function exits and the next statement is reached.
|
|
|
Run to New Script: Run until the first statement of a new script is reached.
|
|
|
Run to Cursor: Run until the statement at the cursor is reached.
|
|
3
|
Scripts Widget: The scripts widget shows the scripts that are currently loaded in the script engine. Clicking on a script will cause its code to be shown in the code widget. When a script is no longer referenced by the debugger target it is removed from the scripts widget.
|
|
4
|
Breakpoints Widget: The breakpoints widget shows all the breakpoints that are set. A breakpoint can be disabled or enabled by clicking the checkbox next to the breakpoint's ID (the ID is provided so that the breakpoint can be manipulated through the console widget as well).
|
|
5
|
Console Widget: The console widget provides a command-line interface to the debugger's functionality, and also serves as an interactive script interpreter. The set of commands and their syntax is inspired by GDB, the GNU Debugger. Commands and script variables are auto-completed through the TAB key.
|
|
|
Debug Output Widget: The debug output widget shows messages generated by the print() script function. Scripts can use the special variables __FILE__ and __LINE__ to include the current location information in the messages.
|
|
|
Error Log Widget: The error log widget shows error messages that have been generated. All uncaught exceptions that occur in the engine will appear here.
|
|
6
|
Stack Widget: The stack widget shows a backtrace of the script execution state. Each row represents one frame in the stack. A row contains the frame index (0 being the inner-most frame), the name of the script function, and the location (file name and line number). To select a particular stack frame to inspect, click on its row.
|
|
7
|
Locals Widget: The locals widget shows the variables that are local to the currently selected stack frame; that is, the properties of the objects in the scope chain and the this-object. Objects can be expanded, so that their properties can be examined, recursively. Properties whose value has changed are shown in bold font.
| |
|
|
|
|
|
For more info about Debugging Java Scripts please visit this page
|
|
|
|