|
|
Environments Settings
|
|
|
3D scenes require some sort of lighting, to give 3D scenes/models a more realistic look. Environments for rendering in SimLab RT can get lighting from HDR, from Sun, or from lights and emitters defined in the scene. The user has the option mix and match between these light sources. This can be done by enabling the HDR and the Sun each from its Render Settings dialog; this dialog has four tabs, described below;
|
|
|
HDR Environment
|
|
|
|
|
|
|
|
|
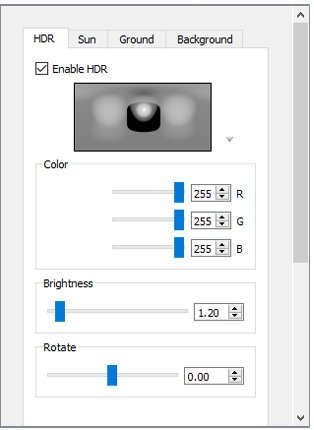
Clicking the HDR option will display its render Settings in the properties panel. HDR is the easiest method for achieving photo realistic views of MCAD, and studio shots of a product, HDR’s are files of types (*.hdr) or (*.exr). Environment images are applied as a sphere surrounding the 3D scene. They include light sources that are automatically used when rendering the 3D Scene.
To select an HDR file click the environment settings in the render menu. This will open a windows dialog where the user can browse to the HDR file to use. Or just double click an HDR image from the library panel, to display the selected HDR, the user needs to make sure that the background is set to Environment.
|
|
|
The color and brightness of the HDR image can be adjusted in the render settings dialog, and the new settings will automatically be saved and applied. The user can also rotate the environment image, by adjusting its slider in the render settings dialog.
SimLab Composer provides a number of HDR environment images, free and commercial environment images can be used to extend the SimLab Composer selection of environment images.
|
|
|
Sun Environment
|
|
|
|
|
|
|
|
|
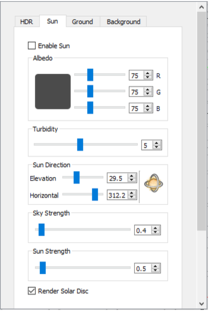
This environment setting simulates physical sky at different sun angles (Solar Elevation), which determines the time of the day. The sliders of the parameters of this environment option, makes it easy for the user to view the effect of each parameter, in real time.
The user can select to Enable Sun, in the render settings, in addition to enabling the HDR.
|
|
|
|
|
|
The user has multiple parameters to control the sky:
|
|
|
Albedo: This parameter controls the effect of ground color reflection, which in turn affects the color and feel of the sky.
Turbidity: This parameter affects the clarity of the sky.
Solar Horizontal Angle: This parameter sets the rotation of the sun around the zenith.
Users not comfortable with specifying numerical values for Solar Elevation, and Solar Horizontal Angle, can add Sun Light for the Light toolbar. Changing the direction of the sun, using its draggers, and then clicking the accept mark; will update the values in these two fields, if the Sun is selected as the light source.
Sky Strength and Sun Strength: These two parameters can be used to increase/decrease the sky/sun strength effect on the rendered image.
More details about rendering parameters can be found in Renderer Help, under the Help menu in the Settings/Help Bar of the application interface.
Render Solar Disc: This check box option, when checked, will show the solar disc in the rendered image.
|
|
|
Ground
|
|
|
|
|
|
|
|
|
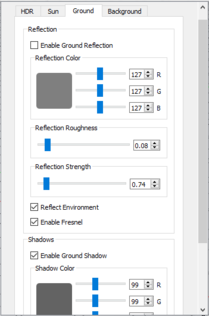
When setting the environment light source for rendering, the user has options for adding ground shadow and/or ground reflection to the 2D ground:
Ground Shadow: When clicked, its Render Settings will appear in the Tree/Task Panel. This option will generate shadows on the ground, and the user can select the color and strength of the generated shadows. To apply the shadow settings to rendering, the user needs to check the Enable Ground Shadow option.
Ground Reflection: Turns the ground into a reflective plane, where the user controls reflection color, roughness, and strength. The Enable Fresnel option determines whether fresnel reflections are enabled or disabled. To simulate metallic looking reflections, Fresnel reflections should be disabled. Environment Reflection option, reflects the scene’s environment when checked.
To apply the reflection settings to rendering, the user needs to check the Enable Ground Reflection option.
|
|
|
Background
|
|
|
|
|
|
|
|
|
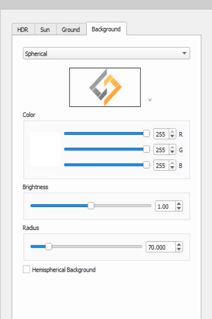
The background for rendering can be one of four options;
|
|
|
From Environment: Selecting this background option will apply Environment settings to the rendering background.
|
|
|
Single Color: With this background option the user can select a color to use for the background of the rendered image.
|
|
|
Background Image: This background setting option requires the user to browse to an image file to be used for the background of the rendered image.
|
|
|
Spherical Background: enables the user to select (*.hdr), (*.exr), or any image file, that will be wrapped around a sphere or hemisphere, and select color, size and brightness. This option is added to give users more control since the Environment-HDR (global HDR) in the Render Settings dialog can be rotated, but cannot be scaled.
|
|
|
|
|
|
Advanced Render Settings
|
|
|
In this panel the user can set the main rendering parameters.
|
|
|
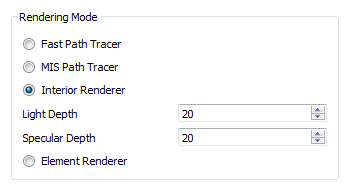
Rendering modes: SimLab Composer provides four types of rendering modes:
o Fast Path Tracer.
o MIS Path Tracer.
o Interior Renderer.
o Element Renderer.
Render Max Depth: is the number of ray bounces of the light. Increasing the number of ray bounces improves lighting for complex scenes, especially diamond and glass scenes, but it slows rendering.
Automatic locking Time (seconds); is the time in seconds after which the image will be locked for navigation, in case of Real Time View rendering. Setting this value to Zero will disable automatic locking.
Image ratio during navigation; is the ratio of the rendered image dimensions to use while navigating the scene.
Number of cores to be ignored; is the number of CPU cores not be used by the renderer. This is helpful when the user is working on other applications while rendering. Setting this parameter to 0 will use all cores for rendering.
|
|
|
|
|
|
|
|
|
Settings related to the functionality of Interior Renderer Mode:
|
|
|
1. Light Depth: Set the amount of light energy.
2. Specular Depth: Control the visual appearance of specular reflections. It represents the amount of specular reflectivity a surface has.
|
|
|
The default values for both of Light Depth and Specular Depth (which is "3") are good and commonly used. Don't change this unless you really know what you're doing.
|
|
|
Output Image Tab
|
|
|
In this task bar the user can select the format for the output image and its dimensions.
|
|
|
The properties panel will display Render Settings dialog. In this dialog the user can input the base file name, the output folder, and SPP to limit the rendering. The open containing folder check option will open the output folder after finishing rendering.
|
|
|
|
|
|
|