Automation Workbench
|
|
Introduction:
|
|
|
SimLab Composer allows using Java Scripts to automate processes, Java script automation is supported in two modes:
|
|
|
|
|
|
|
|
|
|
 |
Scripting is supporting in the Ultimate edition of SimLab Composer
|
|
|
|
|
|
Command line Java Scripts:
|
|
|
Java scripts can be run from the command line by using the following command
SimLabComposer.exe -js “File.js” So if the user named the first script as example.js . And saved it in folder C:\Scripts, The user should use the following command
SimLabComposer.exe -js “C:\Scripts\example.js” |
|
|
|
|
|
Passing arguments to Java Scripts:
|
|
|
Looking at the first example, the user defined on top of the java script the name of the file to be imported and the output image file.
|
|
|
|
|
|
For this script to work as expected, it is the users responsibility to name and place the input file as "c:\\temp\\input.obj" and to make sure the output file "c:\\temp\\output.png" is copied to another place before re-running the java script, so it is not overwritten.
Another option for the user it to use the input file name and the output image name as arguments as shown in the following scripting
To do this, instead of defining the variables on top of the script as done before, we can use the runtime.args functionality, as shown in the following example:
var inputFile = runtime.args.getAsString( "-i" ); //you can pass this arg if you want to import another file that doesn't include in your current scene
var outputImage = runtime.args.getAsString( "-o" );
Other than changing the first two lines, the rest of the script is just the same.
To use the argument based script as before the user should use the following command:
SimLabComposer.exe -js "C:\Scripts\script.js" -i “c:\\temp\\input.obj” -o “c:\\temp\\output.png” This allows the user to control the import file and output image on the command line.
|
|
|
|
|
|
runtime.args supports the following argument types:
|
|
|
|
|
|
My first Java Script:
|
 |
The following script, imports a file, sets camera in a good position, and renders an image and saves it.
|
|
|
var inputFile = "c:\\temp\\input.obj"; var outputImage = "c:\\temp\\output.png"; scene.reset(); // First we clean the scene var importedScene = scene.importFile(inputFile); // We import the input file var bBox = importedScene.computeBoundingBox(); // Get the bouding box of the scene var displacementFromWorldCenter = new Vector3(-bBox.center.x, -bBox.center.y, -bBox.center.z); importedScene.transform.translateInPlace(displacementFromWorldCenter); // Move the model to the world center var newCamera= scene.createCamera(); //Create new Camera newCamera.fov = 30; newCamera.position.set(1.5*(bBox.max.x - bBox.min.x),1.5*(bBox.max.y - bBox.min.y), 3*(bBox.max.z - bBox.min.z)); //Set psotion of the camera newCamera.up.set(0,0,1); newCamera.targetPosition.set(0,0,0); //Set targer of the camera runtime.setView(newCamera); // Use the new Cemera scene.render(outputImage, 600, 400); |
|
|
|
|
|
Interactive Scripting - Running Java script interactively
|
|
|
The user can run Java Scripts interactively in different ways:
|
|
|
1. Select a script from the scripting library, drag it, and drop it on the 3D area
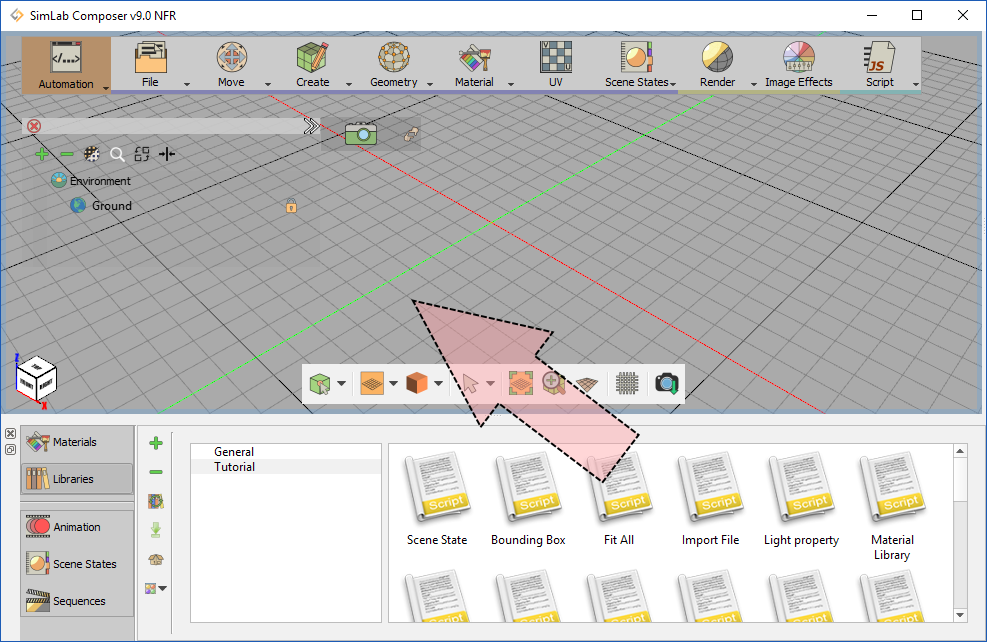 2. Select a script from the library, then from the script menu, click Run
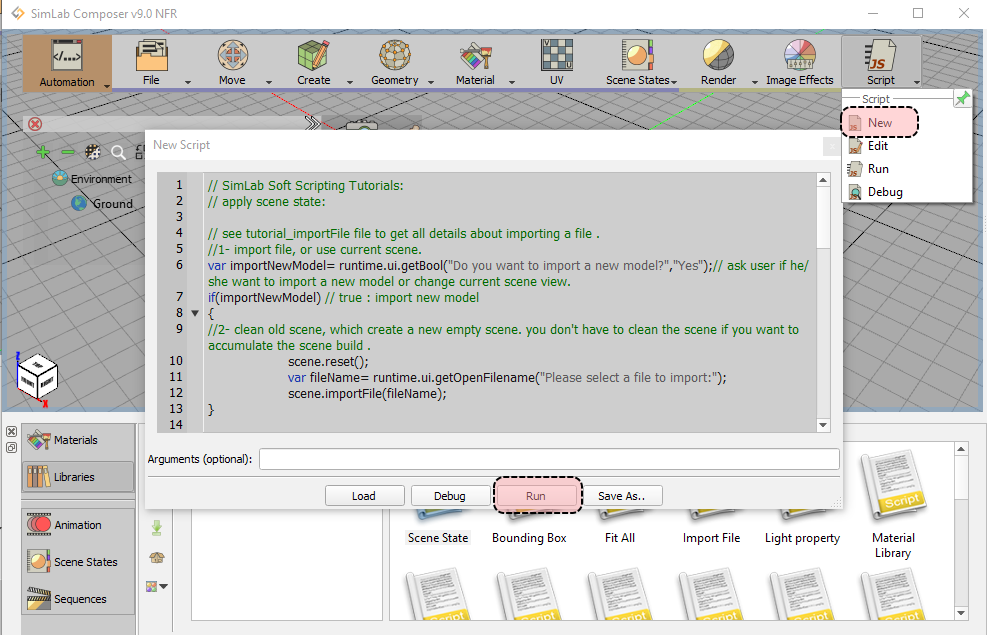
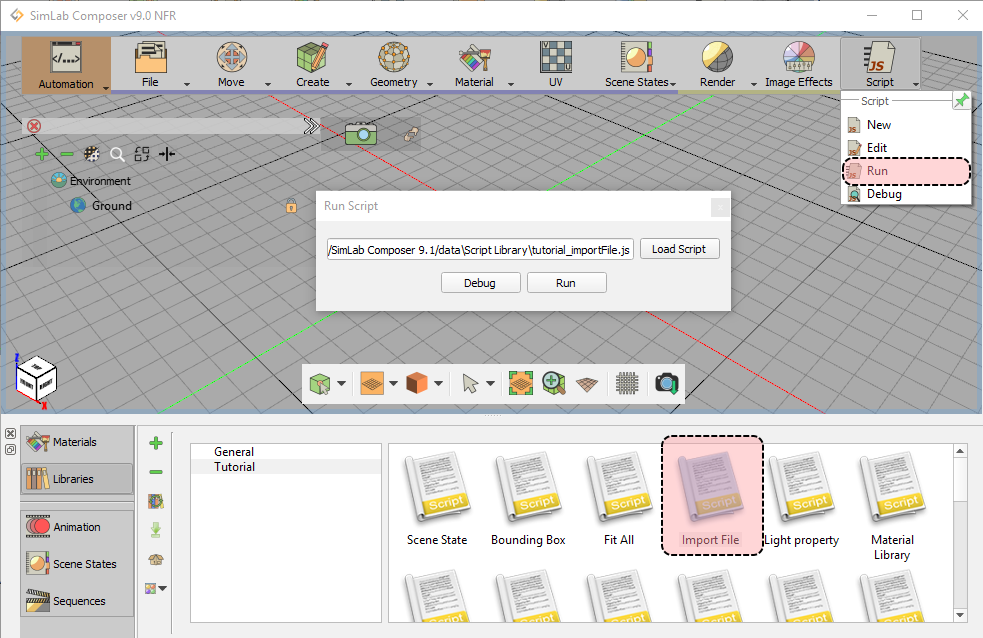 3. From Script menu, click new, type the Java Script code and then click Run
 |
|
|
|
|
|
|
|
|
Using UI Elements In Interactive Mode:
|
|
|
Interactive Java scripts allows the user to create a dialog from the script to collect needed data, supported types include:
|
|
|
|
|
|
The user can simply create GUI to collect users data by using the following command:
var data = runtime.ui.getData("Enter First and Last Frames:", [{type: runtime.ui.DATA_TYPE_VALUE, label:"FirstFrame:" }, {type: runtime.ui.DATA_TYPE_VALUE, label:"LastFrame:" }], true); |
|
|
|
|
|
This script will simply create a frame and allow the user to input values of First and Last frames
Values set by the user will be defined in data[0] and data[1].
|
|
|
|
|
|
 |
|
|
|
|
|
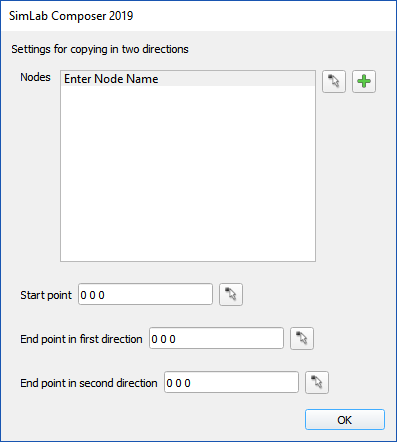
The dialog above was created using the following script:
var data = runtime.ui.getData("Settings for copying in two directions", [ {type: runtime.ui.DATA_TYPE_NODE_ARRAY, label : "Nodes "}, {type: runtime.ui.DATA_TYPE_VECTOR3, label : "Start point"}, {type: runtime.ui.DATA_TYPE_VECTOR3, label : "End point in first direction"}, {type: runtime.ui.DATA_TYPE_VECTOR3, label : "End point in second direction"} ]); |
|
|
The user can set any number of inputs needed for the java script to run, this script is taking multiple objects (Nodes) and two directions which entered by user to copy these objects In two directions.
|
|
|
|
 |
Find the all scripting commands for SimLab Composer online in this page.
|
|
|
|
|
|
|