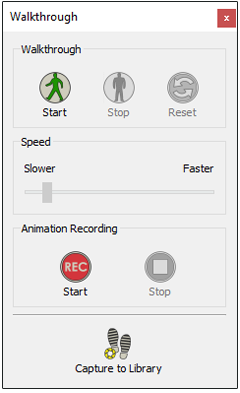
In this part of SimLab Composer interface, the user can create and record full motion video tours of a location. Essentially, creating an animated walkthrough with SimLab Composer is a four step process.
The steps for creating a Walkthrough are simplified as follows:
1. Start and set walkthrough parameters
2. Go on Tour
3. Configure the Time
4. Render the Animation
Each of these steps is covered later in this section.
Start: The button allows you to open the Walk-through Parameters dialog box. This group of parameters controls dimensions and behavior of the camera measured in meter, m/s,or rad/s, which you can set to define and describe the characteristics of the camera object that you will take on while being in the scene.
Stop: When you are done with the tour in your scene, click over the Stop button in order to exit walk-through mode and return the normal navigation mode for your scene.
Reset: This button allows you to reset the walk-through to its origins represented only in the initial start location and the initial orientation.
The Walk-through feature includes several keystrokes for controlling the camera’s movement. The arrow keys move the camera forward, left, back, and right. You can also use the Z and X keys to rotate the camera left and right. Pressing the Z or X keys while the camera is moving changes the direction in which the camera points.
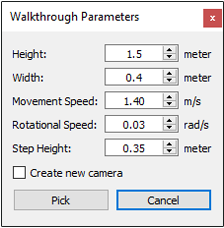
Walkthrough Parameters:
This panel is located at the rightmost on the Walk-through icon. You find the following buttons in the Walk-through panel, as shown in the following image:
a. Height: Set your length in meters, this value presents the length of your body that affects. In the scene, this affects your proceeding when you encounter a low ceiling.
b. Width: Select your width in meters, this value presents the width of your body. In the scene, this affects your proceeding when you encounter a gap between two close objects.
c. Movement Speed: Determine your movement speed in m/s (Meters Per Second). The higher value you assign, the faster you move.
d. Rotational Speed: Specify your rotation speed in rad/s (Radians Per Second).
e. Step Height: Set the height of your steps in meters while walking in the scene, this value shows the maximum object's height that you can climb in scene.
f. Create New Camera: You can select this checkbox to create a new camera to be dedicated to Walk-through, or leave it unselected to use the Active Camera. Walkthrough can be performed using the Active Camera or a new created camera.
g. Pick: Complete the dialog box and click the Pick button to accept the current settings. After the dialog box is closed, you'll have to pick the start location and direction.
h. Cancel: Click Cancel to abort task. This closes the dialog box without any changes.
Once you deploy the camera, the overall settings will be applied. A mode is enabled in which you can control the camera using the keyboard. Walk-through feature moves through the scene like a first-person video game where collision detection is also enabled, how cool is that!
Beware of falling! Always ensures that the feet stay parallel to the ground or an object's surface at all times and can be used to walk over soft or rough terrain. If that happened, just click the Reset button.
Cannot see your scene! Always, keep a logical ratio between the size of the camera and scene itself.
Hiding an object in the scene does not disable collision with that object during walk-through.