![]()
Learn
SimLab Composer
Simab 3D Products \SimLab Composer 2.4

|


|
Tutorial:
Visualizing a 3D Model
In this tutorial we are going to use scene
states to show exploded and section views of a 3D model. Those
states will be exported to a 3D PDF file, and will be used in
creating multiple renders of the model.

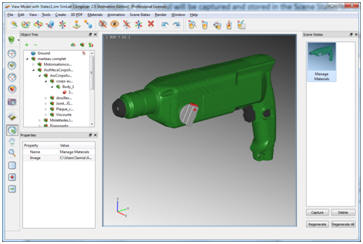
Manage Materials
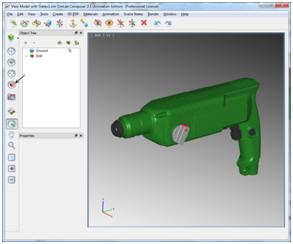
1. Start by creating a new scene, with No Ground.
2.
Click
File ->
Import or press (Ctrl +
I) to import geometry. The Import Geometry window will open
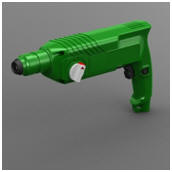
where you can browse for a 3D model file. For this tutorial it is a
Drill 3D model. By default the model will be imported to the center
of the scene, and you can zoom in using the mouse or by clicking
Zoom To Object button, in the Main Toolbar.
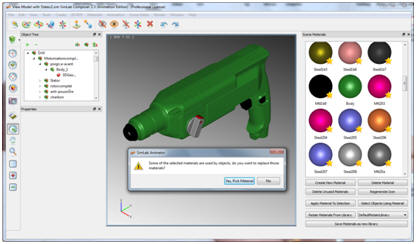
3. Select Manage Scene Materials (Ctrl + M) under the Materials menu. The Scene Materials window will appear on the right side of the application’s window. Click Delete Unused Materials button, in the Scene Materials window, to get rid of unused materials.
4.
By clicking the Drill’s body, you can
find that different parts of its green body use different materials
in the Scene Materials window. To fix this select one of the body’s
green materials and change the Material Name property in the
Properties window to Body. To display the Properties window
right click anywhere on the toolbars area and select Properties,
or select Properties under the View menu. Now select all the
remaining body’s materials (by holding down the Ctrl key), to be
able to select materials easily you can just pull the Scene
Materials window to the left to widen it, as shown in the image
below. Click Delete Material button, in the Scene
Materials window, a message will appear informing that the
materials you are about to delete are used by objects, and if you
want to replace them. Click the Yes, Pick Material button,
and select the material we just named Body.
5.
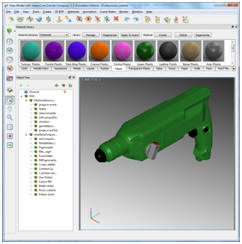
Now to give the drill a real look,
click Show Materials Libraries (Ctrl + B) from the
Materials menu. Select the Plastic tab, and drag the
Green Plastic material and drop it on the drill’s body in the
3D view. Drag and drop the Gray Plastic material onto the drill’s
setting button. The Red Plastic onto the inside of the button, and
finally the Pebble Finish material onto the trigger switch and the
chuck.
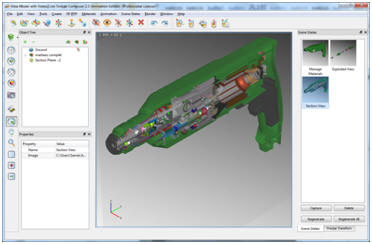
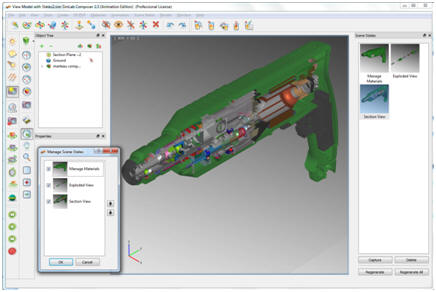
6.
From the Scene States menu
select Manage Scene States, where its window will open on the
right of the application’s window. Again from the Scene States
menu select Capture Scene State, or click the Capture
button in the Scene States window. The state of the model will be
captured and stored in the Scene States window. Change the name of
the state in the Properties window to Mange Materials.
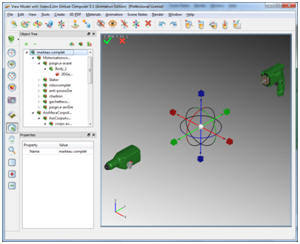
Exploded View
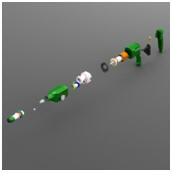
1.
Select the top level of the drill’s
tree (or double click the model), and select Explode Geometry
from the Tools menu. The explode dragger will appear with
three transitional and three rotational draggers. For this model
pull the green dragger. Depending on the model’s assembly structure
in the Object Tree, the model will be exploded into two
sub-assemblies. To end this operation select the correct mark on the
upper left corner of the application window.
2.
Select one of the two subassemblies
(let’s start with the back part), and double click while holding
down the ‘Shift’ key, to select the whole subassembly or you can
just select it directly from the tree. Select Explode Geometry
from the Tools menu, the six draggers will appear again, but
this time on the back subassembly. Pull the green dragger to explode
the different parts of the subassembly, and when satisfied click the
correct mark to finish.
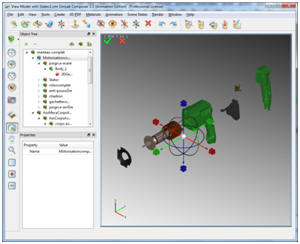
3. Repeat what we just did in the previous step, but with the front part of the drill.
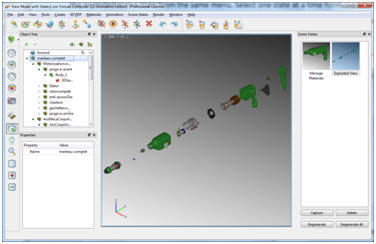
4.
Select Manage Scene States
from Scene States menu, if not still open.
Capture the exploded scene state from the same menu.
Select one state at a time form the Scene States window, and
edit its name in the properties menu to give each a meaningful name.
Now if you are in any state or view of the model you can double
click any state to display it.
5. The exploded view was done in three steps, so to unexplode the model select UnExplode Geometry from the Tools menu three times. Or just double click the Manage Materials state to go to the unexploded state of the model.
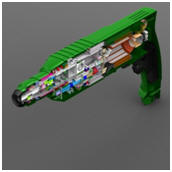
Section View
1. From the Create menu select Section Plane, and a section plane will appear along with six draggers. You can use the draggers to position the section plane, or you can use the Precise Transformation function in the Tools menu. Once you select this function the Precise Transform window will appear on the right hand side of the application window. While the section plane still selected enter -90 degrees in the Z rotation box. The plane will rotate accordingly.
2.
Position the plane using the
draggers, and rotate to view the other side of the model. Again
Zoom To Object, capture the state, and change its name in the
properties window.
Double clicking any of the states created, the view in the 3D area will change to show that state.
After creating these three descriptive states of the product, you are ready to export the 3D PDF file.
Exporting
to 3D PDF
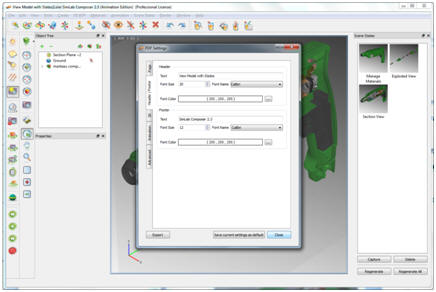
1.
Before exporting to 3D PDF we need to
set the format of the file. Go to 3D PDF menu -> Settings,
the window will open. In the Page tab change the Background
to Single Color gray. In the Header / Footer tab enter the
text you want to appear in the file.
2.
To export to 3D PDF format you can
just click Export from the, already open, PDF Settings
window. Another way is to click the Save current settings as
default button, then click the Close
button, and go to
File -> Export , and
select PDF from the Save as type. Either way, after choosing the
output file name, the Manage Scene States window will appear
to select the order of the states before exporting them to the PDF
file.
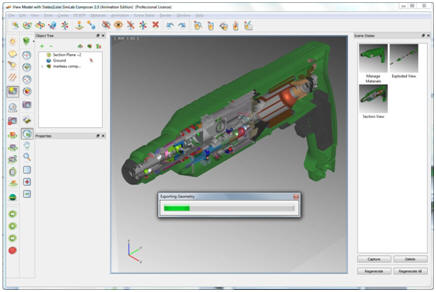
3.
Click Ok, and the
Exporting Geometry
progress bar will appear indicating that the file is being exported.
The export time depends on the size of the file.
Rendering the
States
1- If you have access to SimLab Composer Rendering or Animation editions, you can render scene states by clicking Render scene states tool button in the render toolbar or clicking the menu Render -> Render Scene States.
2-
Captured scene states will be
rendered automatically one by one.
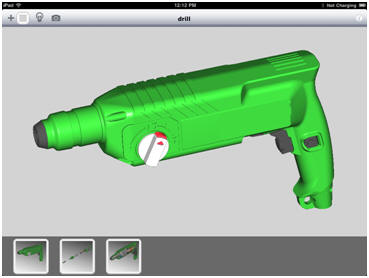
Exporting to IPad
1. The model can be exported to IPad by clicking File -> Export to iPad, and the iPad export window will appear. The file extension for the iPad files is *.zim, input a name for the file, click save.
2.
Exported file can be opened using SimLab CAD Viewer.